how to upload images to a gist
Jupyter Notebook extensions and embedding a gist
Become the JN gist extension & embed a gist in a medium blog
(Last updated October 19, 2018)
This article has five parts:
- Part A: Get the Jupyter Notebook Gist Extension
- Part B: Turn a Jupyter Notebook into a Gist
- Function C: Embed a gist in a Medium blog
- Part D: Debugging (i.e. Troubleshooting)
- Function E: Reflection on changes that occurred within a calendar month
Part A: Get the Jupyter Notebook Gist Extension
There is an extension that allows you to share a Jupyter Notebook equally a gist. According to GitHub, a gist is a fashion to share unmarried files, parts of files, and total applications, simply not directories with other people. Every gist is a git repository, so people tin view the total commit history, complete with differences (diffs), every bit well as Fork and Clone them. In my case a gist will be a unmarried Jupyter Notebook. I am figuring this out because I desire to include a Jupyter Notebook gist along with each of my blogs.
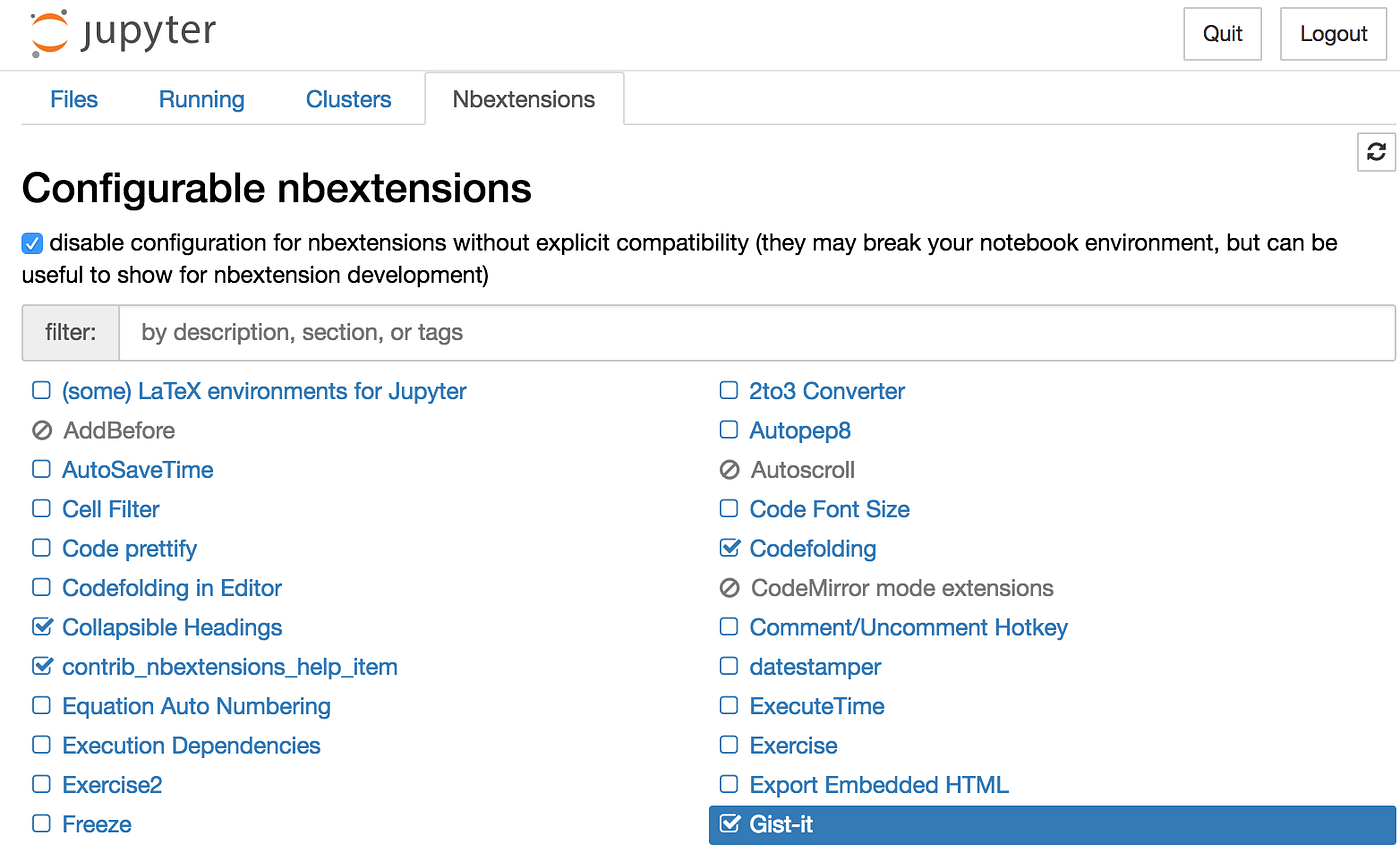
To turn a notebook into a gist, first I need to add together the Nbextensions tab (Effigy ane).
At the time of re-writing and testing this, I just updated (actually totally un- and re-installed) Anaconda3 v5.iii.0.
The official docs for Jupyter's nbextensions are here.
Five steps to get nbextensions are:
- Make sure Jupyter Notebook is airtight
- Open a terminal window
- Blazon the following command:
conda install -c conda-forge jupyter_contrib_nbextensions - Open a Jupyter Notebook & celebrate if you lot see the tab!
- Tic the boxes of the extensions you desire to employ
Other than gist-it, I'm using the following extensions: Lawmaking Font Size, Codefolding, Collapsible Headings, Hide Header, plus the ones that are ticked by default. If y'all want more than, hither's one post on the top 5 extensions from Eliot Andres, a machine learning engineer. What are your favorite extensions?
As of now nbextensions doesn't work in Jupyter Lab. If you come across this change delight comment beneath to permit me know!
Role B: Turn a Jupyter Notebook into a gist
Hypothetically, this should take 3 steps and they are outlined direct beneath. However, zippo related to computers seems to work without a glitch. Due to my biological science background, I'm used to the term 'troubleshoot' in regard to fixing problems. Every bit a microbiologist with an affection for 'bugs', it is very hard for me to switch to the term 'debugging', but I'k trying. To continue the near important steps of this blog near the top, I moved the debugging to the stop. If you get an error bulletin along the way search for the debugging header in the lower part of this blog.
- Generate a personal admission token
To allow Jupyter Notebooks access to a personal GitHub API, go to the Github token generator page, enter your password, and click "Generate new token". On the next page create a token clarification, select scope = gist, and click "Generate token". (In case this changes, here's a link to the jupyter_contrib_nbextention docs.)
2. Enter access token
Render to the Jupyter Notebook nbextensions tab and click on the text of "Gist-it", and so that "Gist-it" becomes highlighted in blue every bit show in the bottom right corner of Effigy two.
Scroll down to Gist-it and click "Disable" so that Enable is now blue (Figure 3).
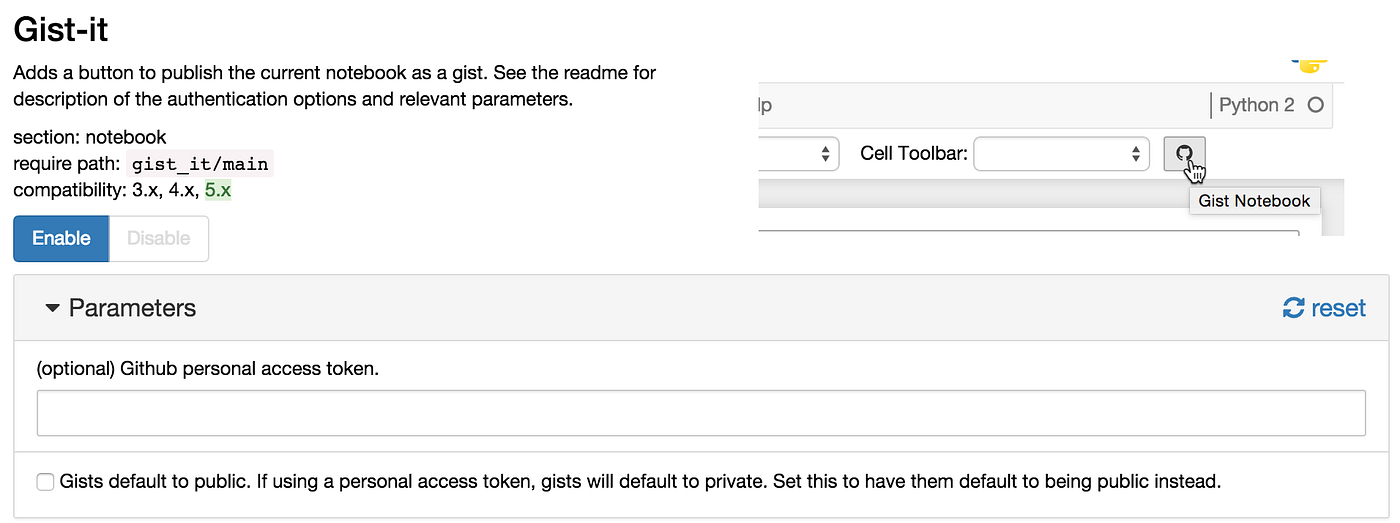
Paste in your Github token, tic the box that says "Gists default to public", and click "Enable".
3. Gist a Jupyter Notebook
From a Jupyter Notebook, click on the GitHub icon, the symbol in the bottom right corner of Figure 4.

The window shown in Effigy v should pop up.
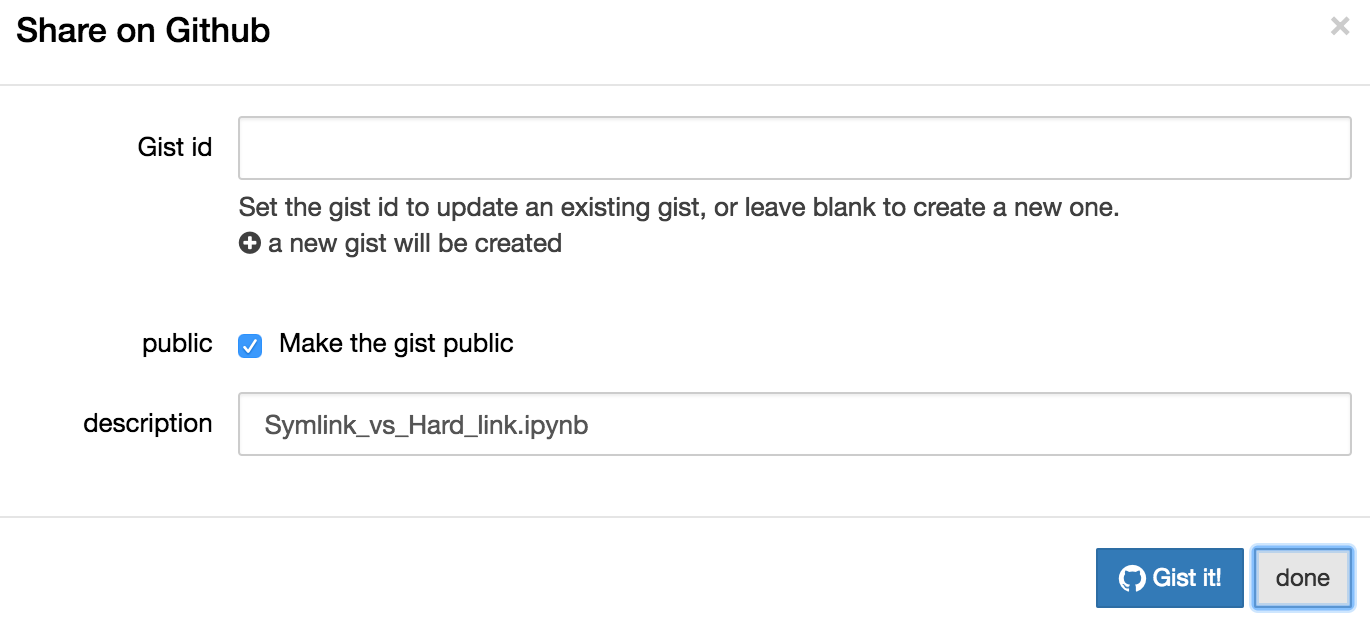
Leave the Gist id bare. Y'all tin can utilize the same name as your file proper name or edit it here. I retrieve that keeping the .ipynb is important, merely I haven't experimented with removing it. Click "Gist information technology!" and the window will change to await like Figure six.
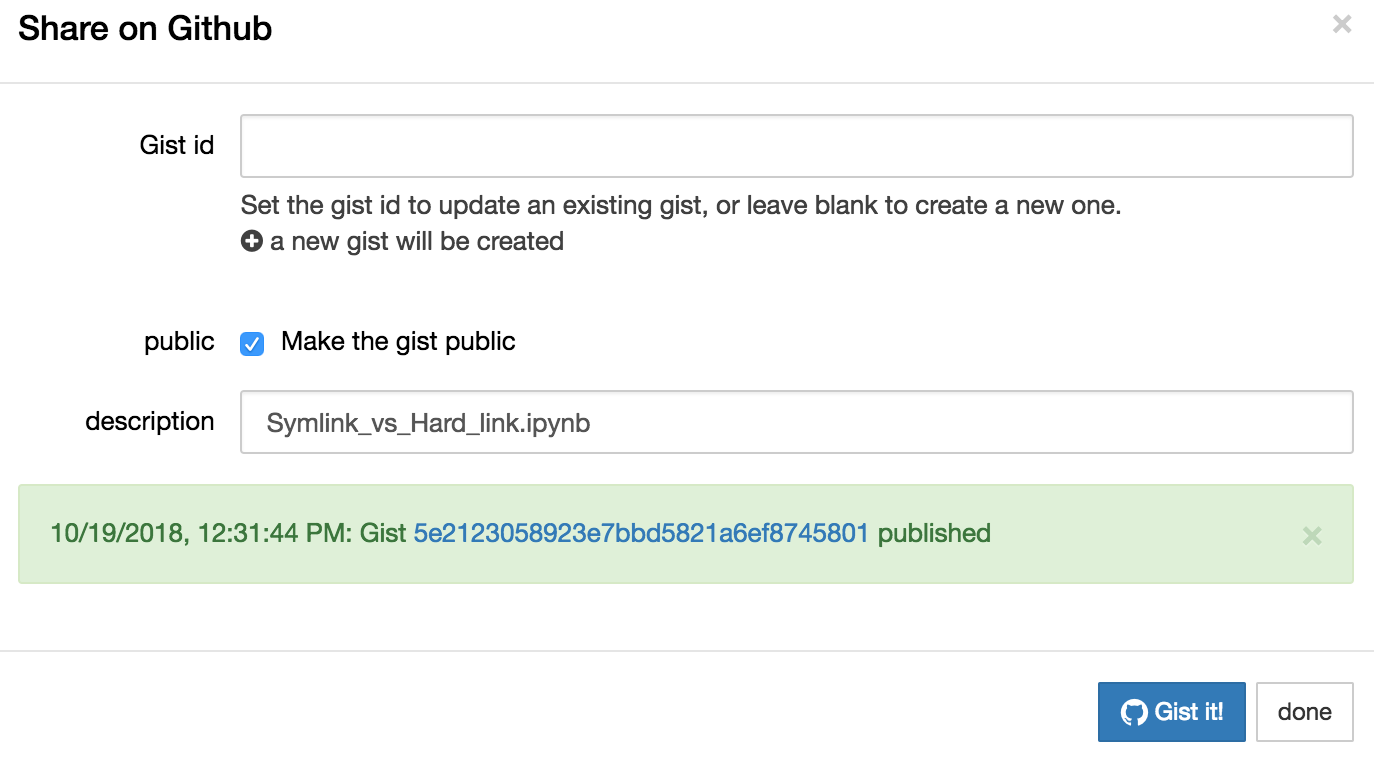
Click on the big long blue number link and you should see something that looks like Effigy seven.
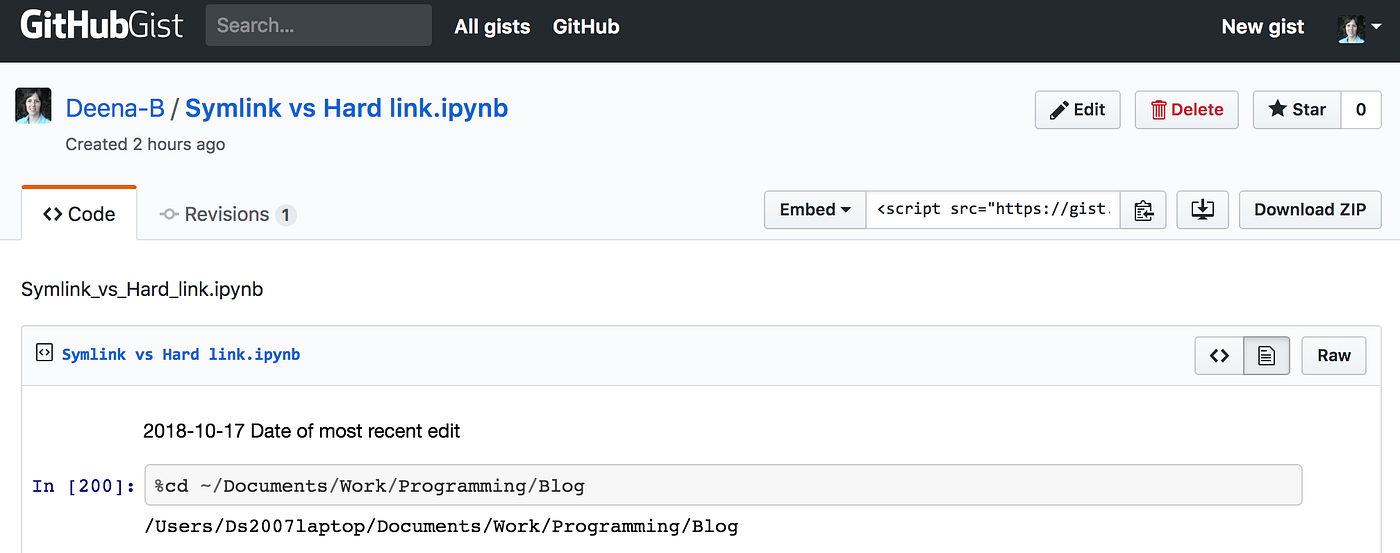
Celebrate — y'all take published a gist on Github!
Part C: Embed a gist in a Medium web log
Technically, this only takes one step. For me it took two because I needed to iterate. Also, there are a number of things that look right or wrong that tin pb you down the wrong path or make you call back you were non successful. All are noted below.
Copying and pasting the line displayed when "Embed" is selected in Figure 7 does not piece of work in a Medium blog because the syntax, as shown below, is for embedding directly into an html file.
`<script src="https://gist.github.com/Deena-B/5e2123058923e7bbd5821a6ef8745801.js"></script>`
- Instead, re-create and paste the link from the "Share" option (Effigy 8). The line volition expect similar this: `https://gist.github.com/Deena-B/5e2123058923e7bbd5821a6ef8745801`. It will atomic number 82 to an inserted paradigm like that seen in Figure nine.

While in blog-editing style, the gist above does non whorl. However, in the published version information technology will scroll, simply only afterward the reader clicks on the epitome! :P
2. To update an epitome you take to re-gist it in the Jupyter Notebook, by clicking on the Github icon and "Gist it!" (see Figures 4 & 6). Then when you re-fresh your blog page it will automatically update.
Thanks for reading this post. Please give me some claps so I can feel the beloved. Happy gist-ing! — Deena
Debugging (i.e. Troubleshooting)
I ran into ii bugs while implementing the steps to a higher place.
- If yous go the error in Figure 10, which reads: "The ajax request to Github went wrong: "message": "Requires authentication"….
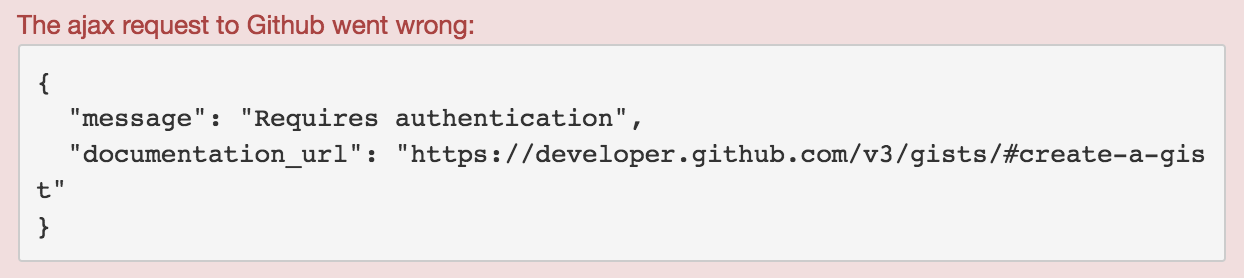
This ways that you need to generate a personal access token and enter information technology in the nbextensions tab (see Role B, steps 1 & 2 higher up).
two. If you get the error in Effigy 11, which reads "This nbextension's crave url (gist_it/master) is referenced by ii dissimilar yaml files on the server…"
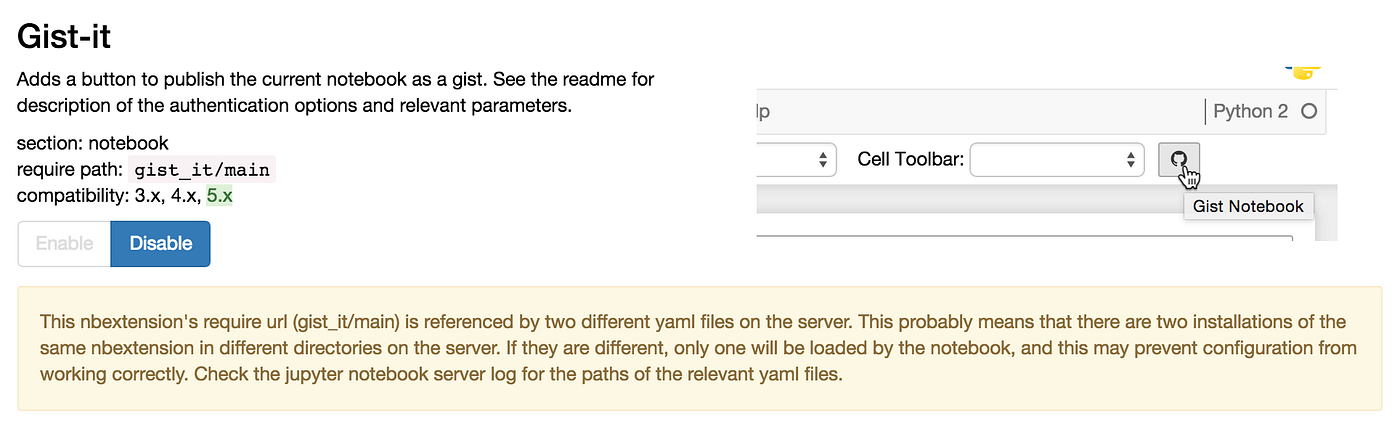
This means that you likely installed jupyter_contrib_nbextensions in two distinct locations. I had one set of nbextension folders installed at ~/Library/Jupyter/nbextensions and another at ~/anaconda3/share/jupyter/nbextensions. To set up it, run the command below:
jupyter contrib nbextension uninstall --user
Then restart Jupyter Notebooks and render to the nbextensions tab.
Alternatively, you could uninstall the other set of nbextension folders by using --sys-prefix. For more data, read about this error in the nbextension issues on Github here and here.
An asside:
My chosen command deleted the re-create at ~/Library/Jupyter/nbextensions. I wonder if I can delete the whole Jupyter binder from my ~/Library since information technology seems like the functional version is in my anaconda3 folder? My ~/Library folder has the post-obit in information technology:

These look different from what is in ~/anaconda3/share/jupyter/nbextensions:

So, I'thousand decided not to delete them… for now.
Part E: Reflection on changes that occurred inside a month
My how things alter quickly! When I start wrote this post, on September 19th, I likewise had to use the ii more than commands, a month subsequently and they are no longer needed. Thank you Conda for making my life easier!
Here is the OLD version of steps I followed on Sept 19:
- Brand sure Jupyter Notebooks are closed
- Open up a concluding window and type the following iii commands
-
conda install -c conda-forge jupyter_contrib_nbextensions -
conda install -c conda-forge jupyter_nbextensions_configurator -
jupyter contrib nbextension install --user - Open a Jupyter Notebook (get frustrated because I didn't see the new tab that I wanted!)
- Get dorsum to the terminal and read what it said… oh I need Node JS
-
brew install node - re-run
jupyter contrib nbextension install --user
jenningstoret1941.blogspot.com
Source: https://medium.com/deena-does-data-science/jupyter-notebook-extensions-e6b57d004e8e
Post a Comment for "how to upload images to a gist"